Table of Contents
My Arch Linux Setup
I’ve set up my Arch Linux environment for over a year now and I haven’t made significant changes to it due to the fact that all of my work is through my company’s Macbooks (with SSH into remote compute resources, of course). I figured since the next few C++ blogs I’ll be writing are going to be done with the linux toolchain, I’d start using my workstation again.
This blog is meant to illustrate how I set up my Arch Linux environment after I’ve set up the appropriate UEFI, swap, and filesystem partitions. I’m not going to explain how boot loaders work, how to set up Pacman (the package manager for Arch), setting up locale, etc. I also won’t cover my vim and zsh setup. With that said, let’s dive in!
Preliminary
Throughout this blog, I’ll be using pacman to install bare necessities, and yay otherwise. To install yay, simply run the following:
archlinux% git clone https://aur.archlinux.org/yay.git
archlinux% cd yay
archlinux% makepkg -si
i3
What is i3? It’s a tiling window manager that allows you to place windows efficiently on your screen, allow simple navigation through keystrokes, separating windows into workspaces, and much more. Below is a screenshot of my setup:
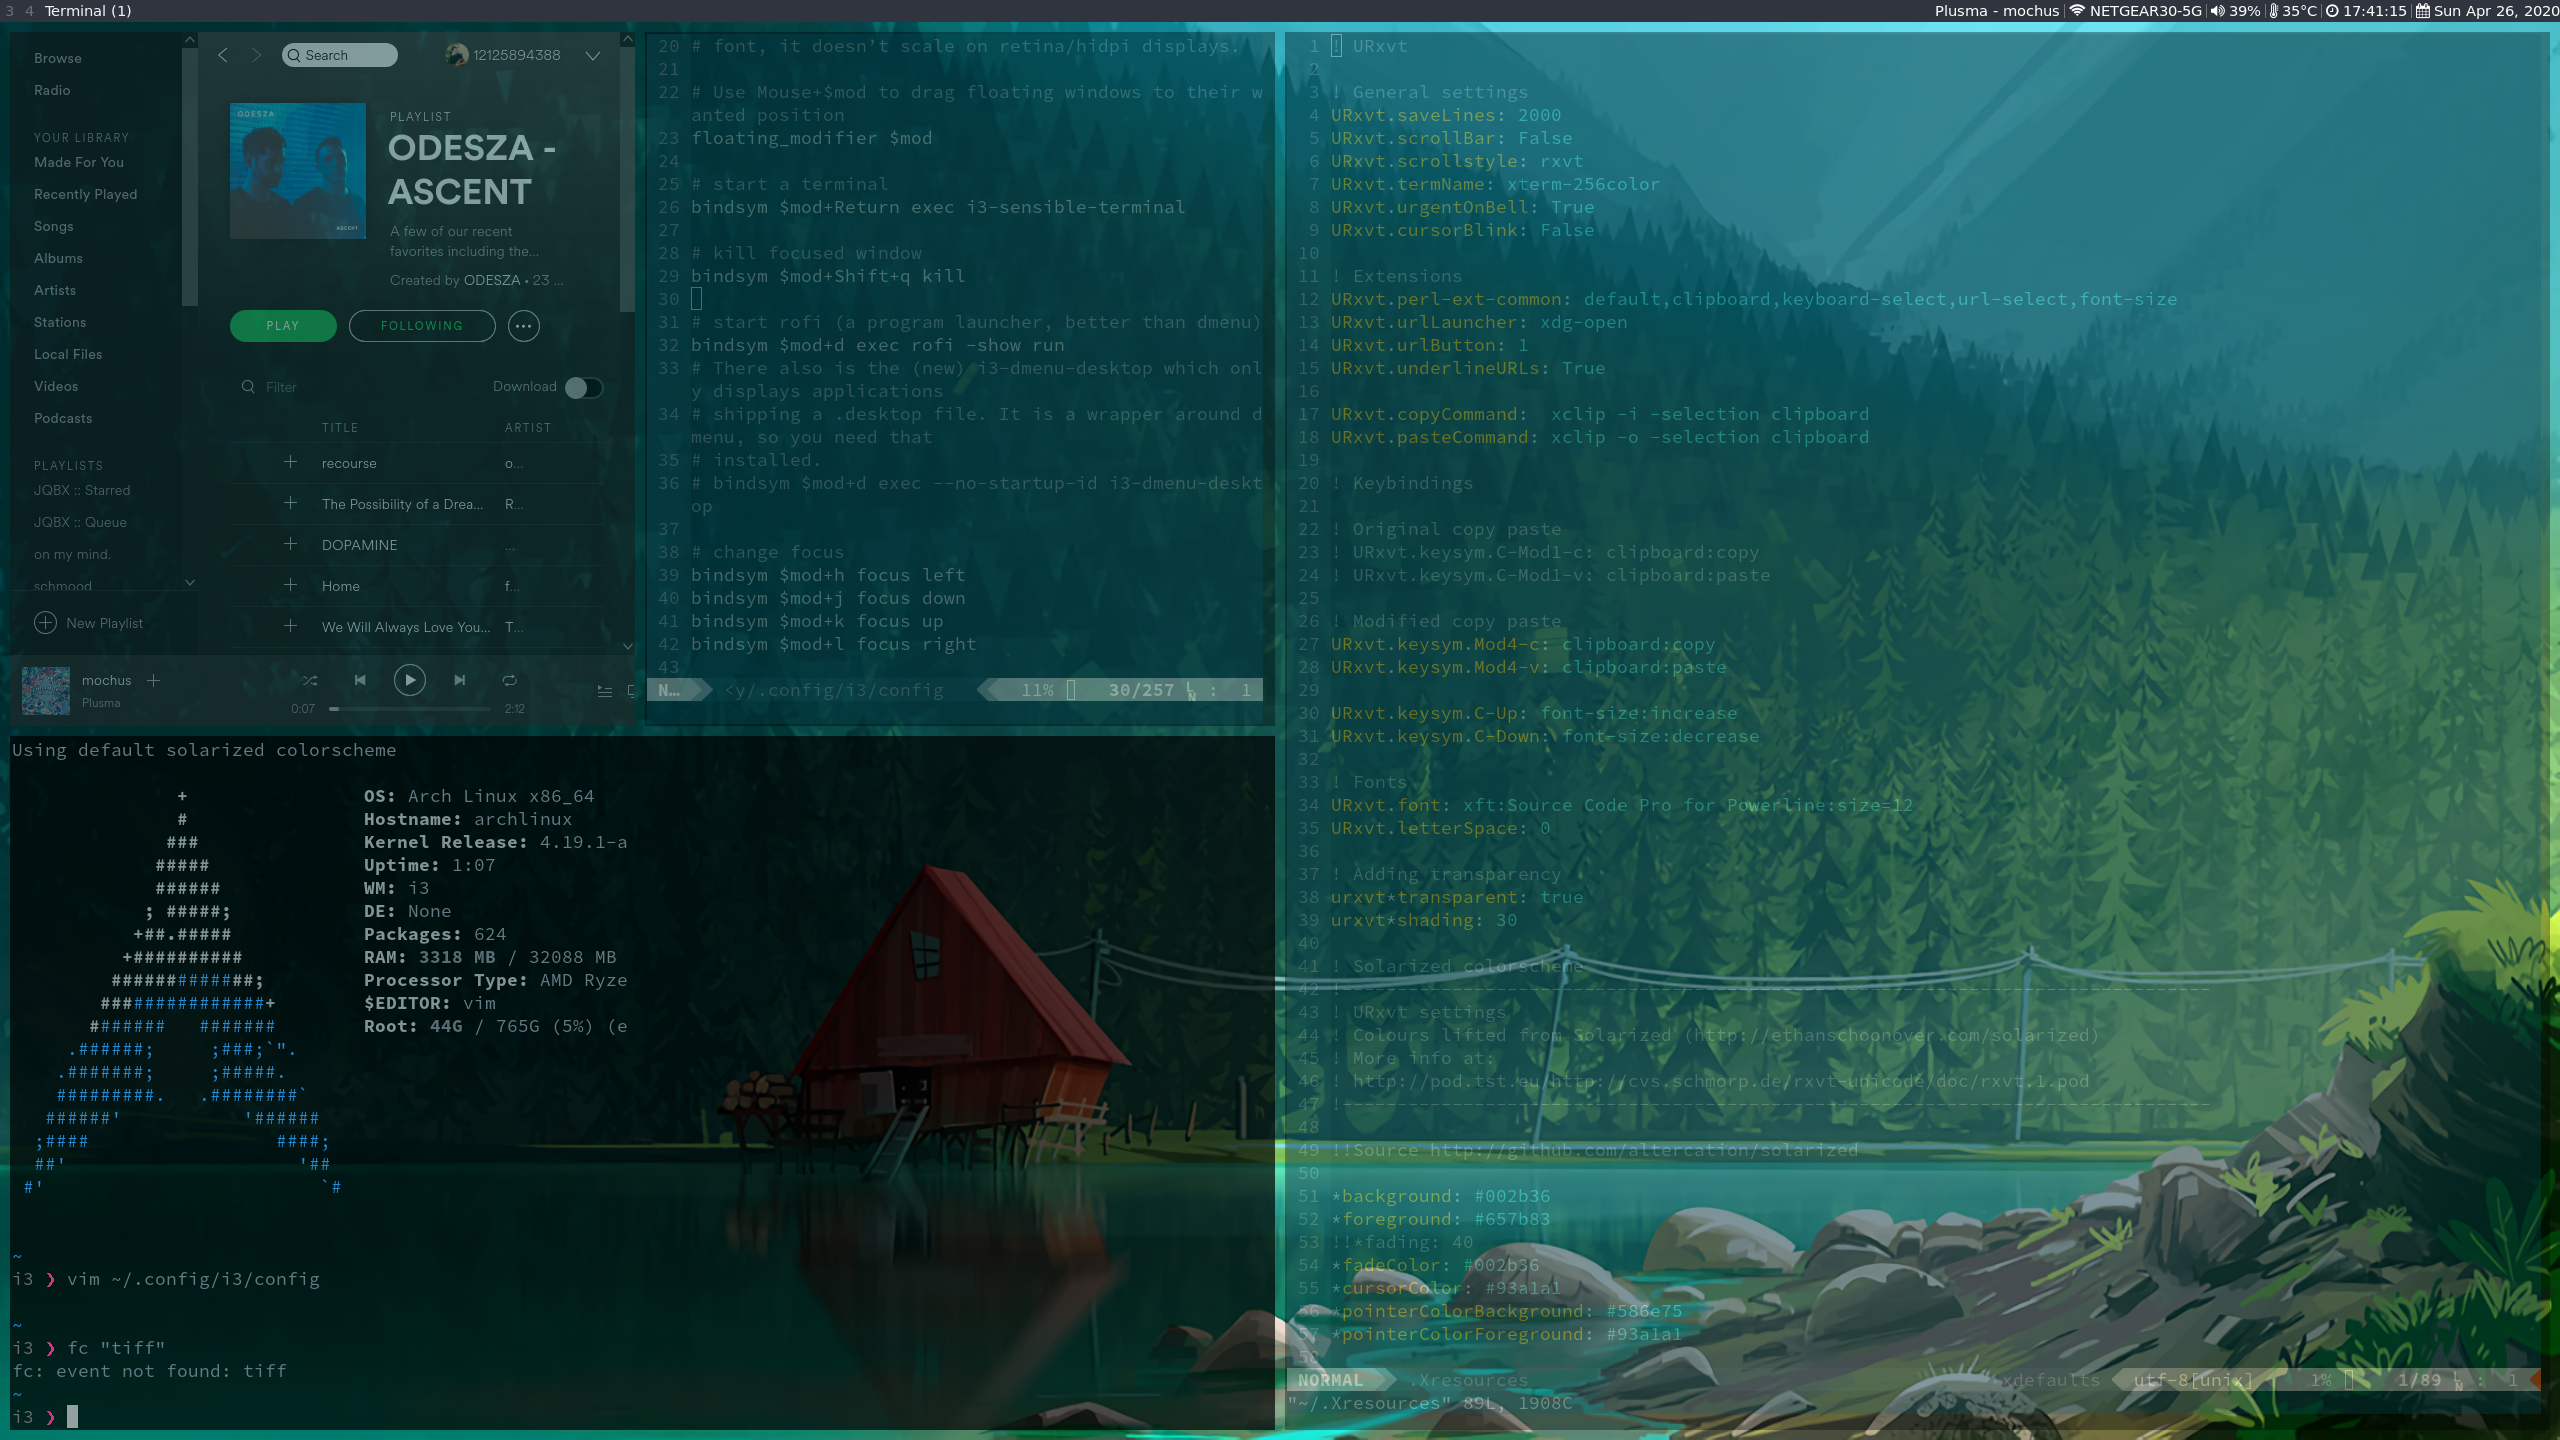
As you can see, I have multiple terminal windows open, as well as Spotify, neatly tiled into bifurcated windows (as I’ll explain later, you can adjust the size of the windows beyond the fixed $\frac{1}{2^n}$ sizes as well). In addition, you can see the status bar above, showing the metrics on the top right and workspace on the left. We’ll explain how to set this up.
Installing i3
So there are two versions of i3 as far as I know. The windows manager I’m using has gaps in between the processes and is called i3-gaps, and the default one is called i3-wm. Install either of these with pacman -S <i3 package>. i3 prompts you to generate a default config file. If you decide to go this route, it’ll ask you to set the modifier key to Alt or the super key (the key itself says “Win”, “Command”, or some random logo). I set it to Alt. You can customize the i3 config(located at ~/.config/i3/config) to change the aesthetics and map your hotkeys.
If you installed i3-gaps, you can add gaps to the windows by adding the following into your i3 configurations:
##
## i3-gaps
##

# Run i3-gaps instead of i3 by default
# i3-gaps will have black bar on top if you have description borders
for_window [class="^.*"] border pixel 0
gaps inner 10
gaps outer 0
i3 Container Manipulation
By container, we mean windows of processes here. For starters, $mod+h/j/k/l will change the focus of your screen to the adjacent container depending on the direction (like vim bindings), and $mod+shift+h/j/k/l will move the selected window, swapping positions with the window in the respective direction.
When a window is spawned (let’s say from $mod+enter to create a terminal emulator), the window can spawn horizontally or vertically from your existing focus window. I binded them to $mod+c for horizontal and $mod+v for vertical.
+---------+    +---------+
|         |    |    x    |
|    x    | -> +---------+  (From $mod+v)
|         |    |    y    |
+---------+    +---------+

+---------+    +----+----+
|         |    |    |    |
|    x    | -> | x  |  y |  (From $mod+c)
|         |    |    |    |
+---------+    +----+----+
Sometimes, you want a floating window, that you can control with $mod + mouse. This is achievable by using $mod + shift + space.
Sometimes, you don’t necessarily want a binary partition of the screen, and you want one window to be a bit smaller. You can set i3 to resizing mode with $mod + r and h/j/k/l will be resizing the current focused window.
These are the settings:
# change focus
bindsym $mod+h focus left
bindsym $mod+j focus down
bindsym $mod+k focus up
bindsym $mod+l focus right

# move focused window
bindsym $mod+Shift+h move left
bindsym $mod+Shift+j move down
bindsym $mod+Shift+k move up
bindsym $mod+Shift+l move right

# split in horizontal orientation
bindsym $mod+c split h
# split in vertical orientation
bindsym $mod+v split v

# toggle tiling / floating
bindsym $mod+Shift+space floating toggle

mode "resize" {
        bindsym h resize shrink width 10 px or 10 ppt
        bindsym j resize grow height 10 px or 10 ppt
        bindsym k resize shrink height 10 px or 10 ppt
        bindsym l resize grow width 10 px or 10 ppt

        bindsym Return mode "default"
        bindsym Escape mode "default"
        bindsym $mod+r mode "default"
}
bindsym $mod+r mode "resize"
i3 Workspaces
This is my favorite feature of i3. On the top left corner of our i3 bar, we have numbers associated with the workspaces we can navigate to. We can usually designate a few of them to be for special purpose. In a later example, I show that I always put the spotify app running in workspace 10.
To navigate to the $n$-th workspace, use $mod + n where n is from 0 to 9. To move the current container to that workspace, use $mod + shift + n:
# Define names for default workspaces for which we configure key bindings later on.
# We use variables to avoid repeating the names in multiple places.
set $ws1 "Terminal (1)"
set $ws2 "2"
...
.set $ws9 "Browser (9)"
set $ws10 "Spotify (0)"

# switch to workspace
bindsym $mod+1 workspace $ws1
...
.bindsym $mod+0 workspace $ws10

# move focused container to workspace
bindsym $mod+Shift+1 move container to workspace $ws1
...
bindsym $mod+Shift+0 move container to workspace $ws10
The configuration is shortened above.
NOTE: Operations like stacking containers(navigable through up focus/down focus) are cool but not covered here. I like using workspaces better.
i3blocks
To pimp out your bar, we first install i3blocks with pacman -S i3blocks, which allows us to display multiple statistics on the right hand side of our bar. It’s precious screen space, so why not put it to good use?
To enable i3blocks at the top of our screen, reading the blocks to add from our config file at ~/.config/i3/i3blocks.conf:
## Setting i3blocks
bar {
  	position top
        status_command i3blocks -c /home/ray/.config/i3/i3blocks.conf
	font pango:FontAwesome 10
	# Other configs here...
}
We use the FontAwesome font to display some crazy icons like the wifi logo, sound logo, temperature logo, etc.
The below is my i3blocks.conf:
[spotify]
command=python /home/ray/.config/i3/spotify.py
interval=1
separator=true

[wifi]
label=<?>
command=iwgetid -r;[[ -z "${BLOCK_BUTTON}" ]] || urxvt -e sh -c "nmcli d wifi list; printf '\n\n   Type the following to connect to a wireless network: \n\n   $ nmcli dev wifi connect <SSID>\n\n'; bash --norc"
separator=true
interval=3

[volume]
label=<?>
interval=1
separator=true
command=amixer get Master | egrep -o "[0-9]+%" | sed -n '2 p'

[temperature]
command=T=$(cat /sys/class/thermal/thermal_zone0/temp); echo $(( $T / 1000 ))°C
label=<?>
interval=10
separator=true

[time]
command=date '+%H:%M:%S'
interval=2
label=<?>
separator=true

[day]
command=date '+%a %b %e, %Y';[[ -z "${BLOCK_BUTTON}" ]] || gsimplecal &
interval=2
label=<?>
separator=true
I can’t display the characters denoted by <?> on my blog because I’m not using a patched version for fonts that support glyphs. You can just replace them with text if you want! The spotify script is obtained from this repo.
It looks like this:

Setting Backgrounds
You can set a background image using feh. First install an image viewing tool with sudo pacman -S feh, and use the below command to set a background in the i3 config :config
# run feh to set background image
exec_always feh --bg-scale ~/wallpapers/wallpaper5.png
I save all of my backgrounds in my github repo here.
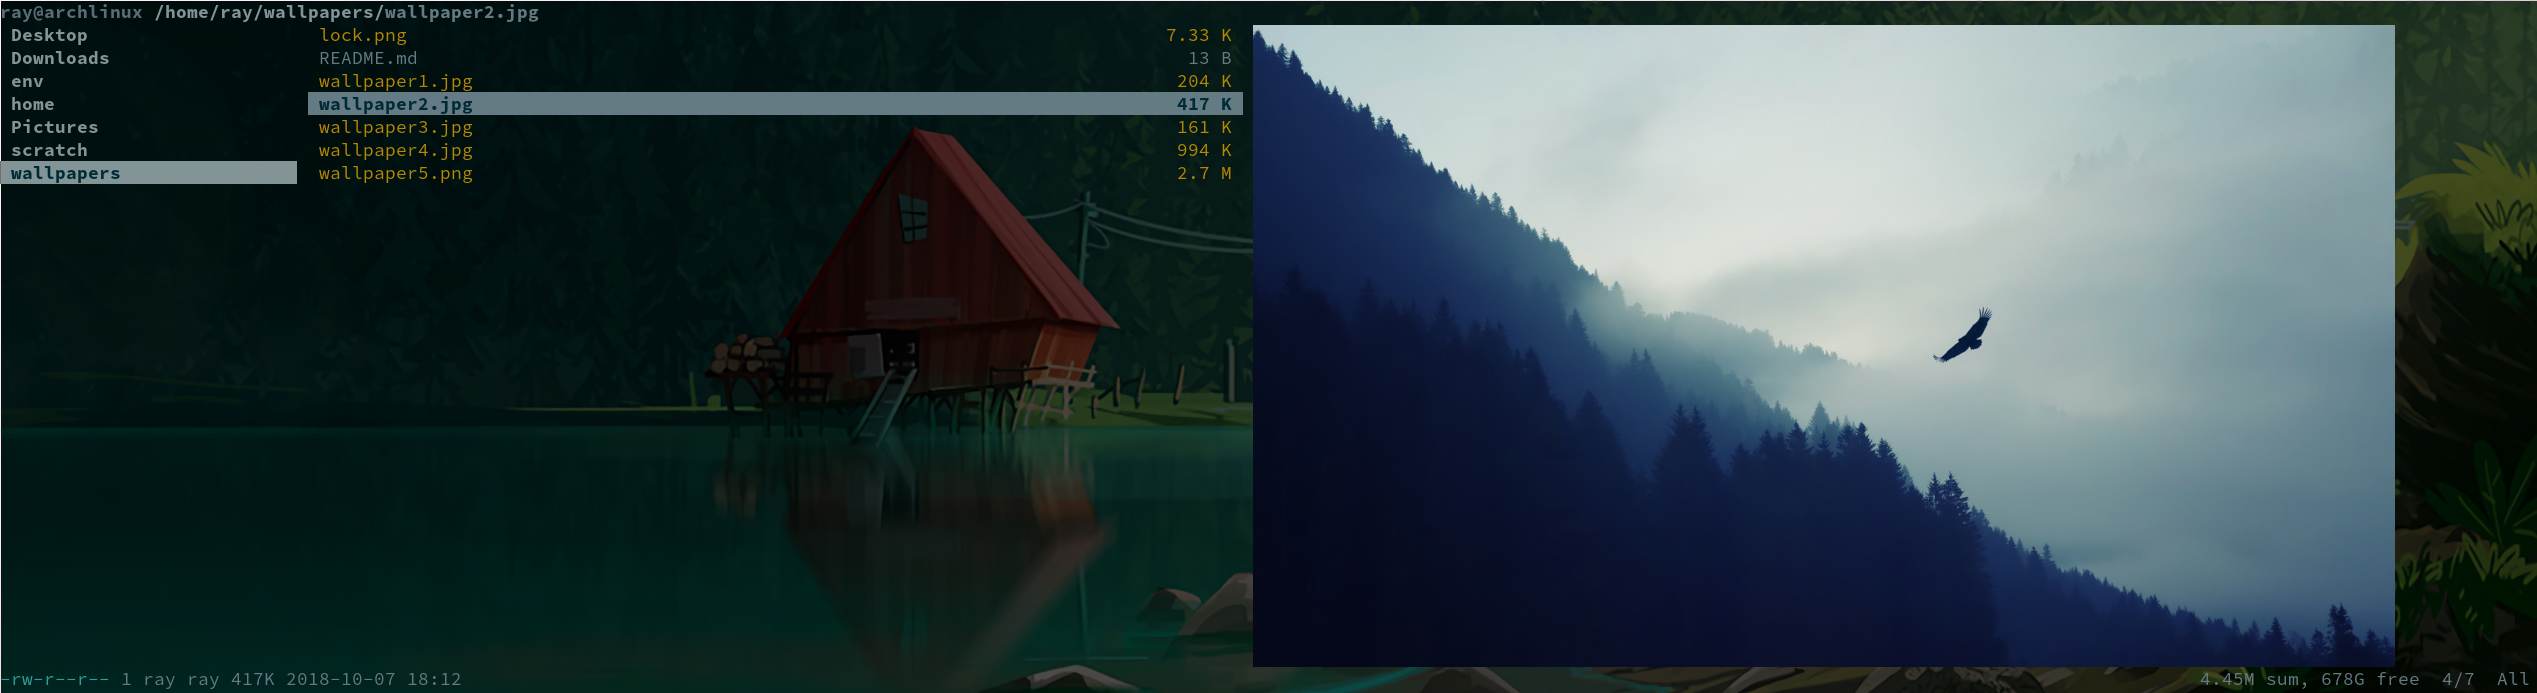
Using a File Manager
If you want to be a supreme vim overlord and have bindings on everything, I suggest using ranger, installable via sudo pacman -S ranger. If you want to just have a typical gnome-like experience, try SpaceFM or PCManFM, which are two great GUI file managers. Add this into your config if you want to trigger ranger with hotkeys:
# Open file explorer (ranger)
bindsym $mod+Shift+f exec urxvt -e ranger
We want to have image preview for ranger, since by itself it’s fairly lightweight. To do this, sudo pacman -S w3m terminator and add the following file into the ranger config file at ~/.config/ranger/rc.conf:
# Enable previewing images
set preview_images true
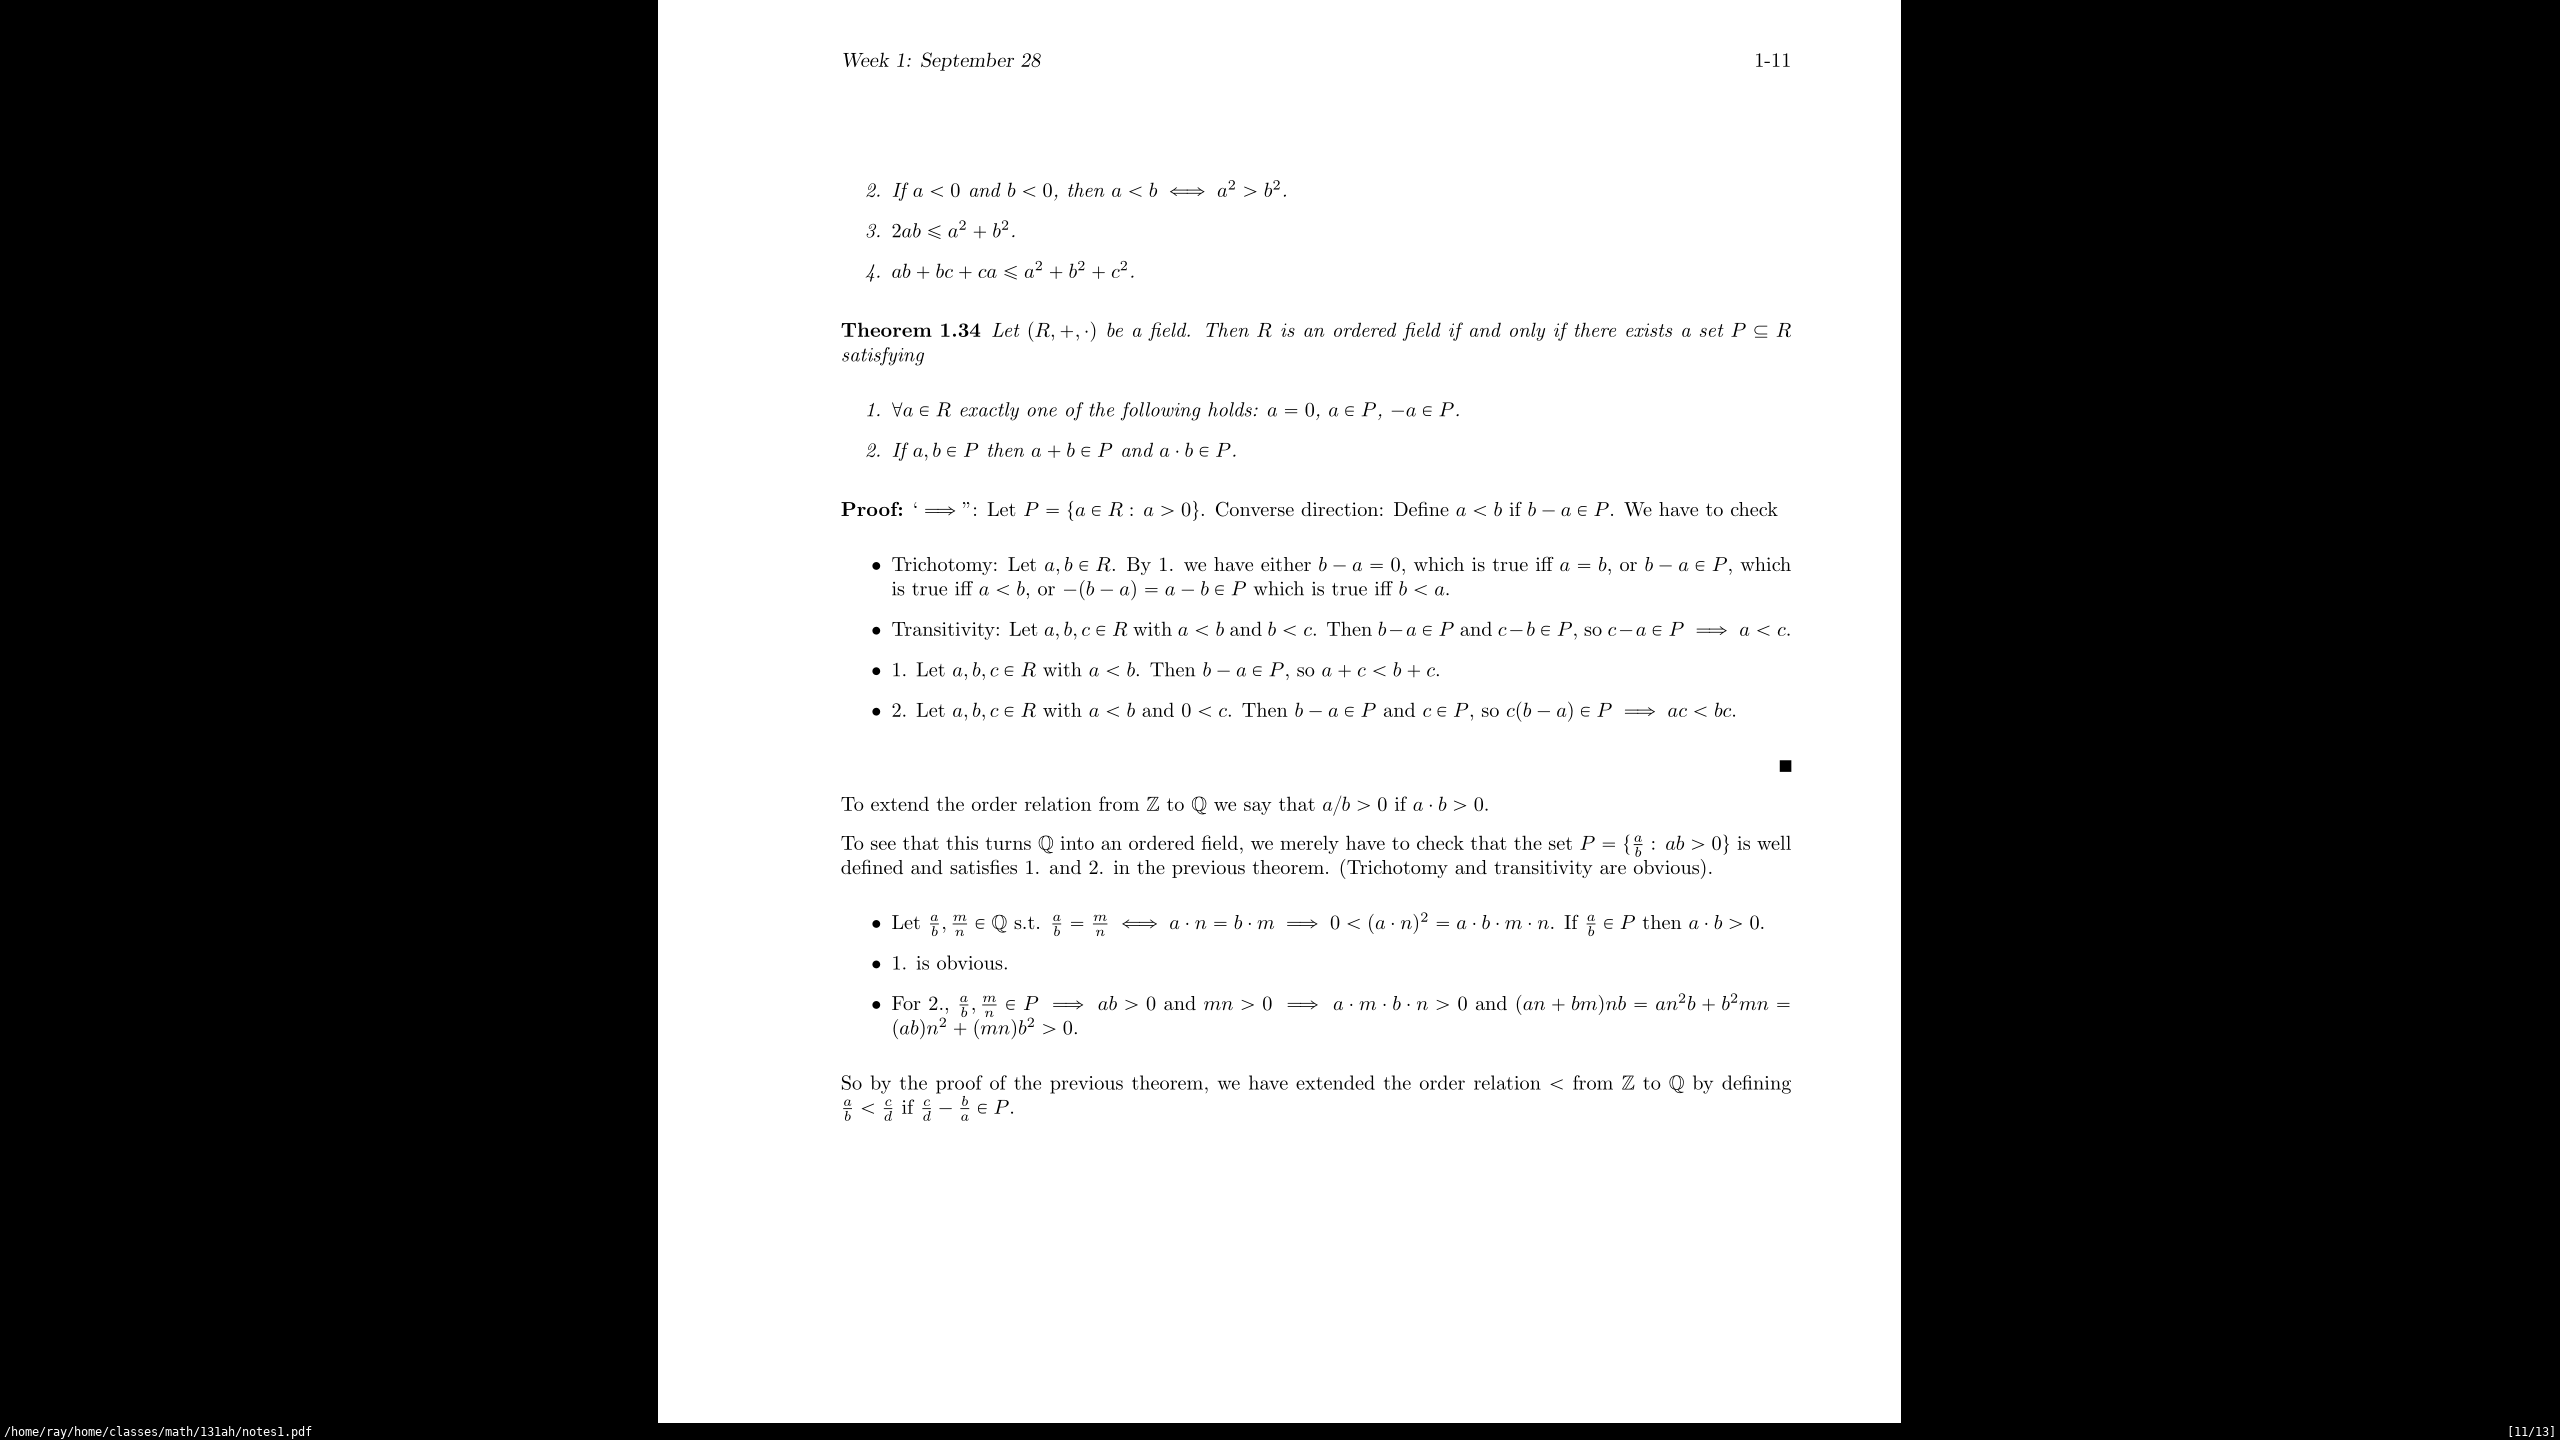
Reading PDF’s
In the theme of vim overlord, install zathura if you want to have a nice pdf viewer with vim-like bindings with sudo pacman -S zathura. I like to alias it to pdf because who would remember to write zathura when they want to read a pdf? (I put this in .zshrc)
# Zathura (pdf viewer)
alias pdf=zathura
Some things I found useful: s for fitting to the width of the document, r for rotating documents, d for two-page view.
Spotify
Everyone listens to music via spotify now, so let’s streamline the operation by setting the last workspace to have spotify upon start-up. To do this, you need the spotify client: sudo yay -S spotify. This is what we add into the i3 config file:
# spotify
for_window [class="spotify"] move to workspace $ws10
exec --no-startup-id i3-msg 'workspace $ws10; exec spotify'
bindsym $mod+shift+s exec spotify
Program Launcher (dmenu replacement)
dmenu is an easy way for users to run applications without having to go into the directory it lives in, and executing it like an uncultured savage. However, it’s really ugly. Let’s use a dmenu replacement like rofi by downloading via sudo pacman -S rofi, and we set the following config:
# start rofi (a program launcher, better than dmenu)
bindsym $mod+d exec rofi -show run
I haven’t found an Alfred replacement, but you can use rofi -show window to switch to whichever window you want. You can also use rofi -show ssh to ssh to any box you have in your ~/.ssh/config file.
Terminal Emulator
We want to install urxvt, which is a terminal emulator. It’s aesthetic because we can change the opacity of the terminal itself, has nice color support, and has multiple font types it can support. To do this, run sudo pacman -S rxvt-unicode. To verify this, simply run:
archlinux% echo $TERM
rxvt-unicode-256color
You should not yet have a ~/.Xresources file, and that’s fine. Below are some things I added into mine:
Solarized Colorscheme
!!Source http://github.com/altercation/solarized

*background: #002b36
*foreground: #657b83
!!*fading: 40
*fadeColor: #002b36
*cursorColor: #93a1a1
*pointerColorBackground: #586e75
*pointerColorForeground: #93a1a1

!! black dark/light
*color0: #073642
*color8: #002b36

!! red dark/light
*color1: #dc322f
*color9: #cb4b16

!! green dark/light
*color2: #859900
*color10: #586e75

!! yellow dark/light
*color3: #b58900
*color11: #657b83

!! blue dark/light
*color4: #268bd2
*color12: #839496

!! magenta dark/light
*color5: #d33682
*color13: #6c71c4

!! cyan dark/light
*color6: #2aa198
*color14: #93a1a1

!! white dark/light
*color7: #eee8d5
*color15: #fdf6e3
Aesthetics
! Fonts
URxvt.font: xft:Source Code Pro for Powerline:size=12
URxvt.letterSpace: 0

! Adding transparency
urxvt*transparent: true
urxvt*shading: 30
Note that if you want to use the same font (powerline family fonts), install it using sudo yay -S powerline-fonts-git. Also, some glyphs are not supported by the powerline font, so it may be better to use a patched monospace font if your use case requires it.
Login Manager
We want to have a sexy login manager to greet us for logins. Let’s use lightdm along with its greeter in the Aether theme by installing sudo pacman -S lightdm lightdm-webkit2-greeter lightdm-webkit-theme-aether. No need to change anything in ~/.config/i3/config.
There are of course, different offerings for each of these tools. Feel free to use your own! It’s a constant learning experience so I’ll also be trying to change things up once in a while.